


How I Built Myself Affordable UV LED Exposure Box

Introduction
Alternative photography techniques like cyanotype, salt printing, albumen, and carbon printing rely heavily on UV light for proper exposure. However, during the short winter days in Slovenia, natural sunlight is scarce, making these processes challenging to execute. To solve this problem, I decided to build my own affordable UV LED exposure box for under €60.
This DIY project is not only useful for photographers experimenting with historical printing techniques but also for screen printing, PCB etching, teeth whitening, and more. With a 40x60cm workspace and two adjustable power levels, my UV exposure box is versatile, efficient, and easy to store. In this post, I’ll take you through the entire design and build process, from selecting the right UV lights to assembling the final setup. Let’s get started!!
Selecting the Lights: LED vs. Fluorescent
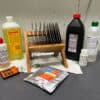
Before I started, I had to figure out what kind of lights to get, as they are an essential part of the UV box. There are not many, but still a variety of options available. Not just any UV light is good for printing—the ideal wavelength is somewhere between 360-410nm.
In the end, I was deciding between fluorescent bulbs that peak between 365-370nm or LEDs that peak between 395-405nm. The shorter the wavelength, the better, so I should buy the fluorescent bulbs, right? Well, maybe if I had the budget, because they cost almost three times as much for the same size of the box as LEDs. They also take some time to reach full power and, when they do, they produce a lot of heat.
So, I started searching for LEDs, which are much cheaper, produce less heat, and are also much smaller. In the end, I ordered two 5m strips of the following LEDs: SMD 5050 UV LED 5m Strip.

Choosing the Best Box
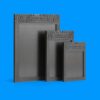
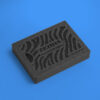
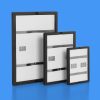
The lights arrived in about a week, and in the meantime, I was thinking a lot about how to design the enclosure. A wooden box was the first thing that came to mind, but it can soon get very heavy and inconvenient to store, plus you need some woodworking skills. I could easily build one, but I kept exploring and, through reading forums, I got the idea to install the LEDs in a simple ready-made plastic storage box.
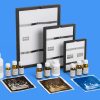
I already had a particular box in mind, which is a bit more industrial, with thicker and more durable plastic. During the summer, I was converting a minivan into a camper, and these boxes came in handy. So, I went to the hardware store and bought one along with some switches. The external size of the box is 40x60cm, and the internal size is 36x56cm. Unfortunately, I do not have a link to it, but I am sure you will be able to find something similar.
Time to Start Building
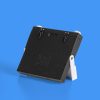
I received the LED strips in the mail, and the box was ready to go. To make the process easier, I decided to spend a few extra euros on a thin sheet of plywood on which I mounted the LEDs. I could have just attached them directly to the inside of the box, but soldering and wiring would have been much harder.
Since plywood is not the best surface for adhering, I decided to cover the front with some reflective aluminum tape, which also helps bounce back all the light that might otherwise be lost.


Cutting and Arranging the LED Strips
Next step was cutting two 5m long LED strips into twenty 50cm long pieces, which would be stacked in rows. I thought I would just be able to cut them with scissors, but it turns out that they are soldered together at every 50cm, so I had to desolder each strip. It was a long process, but I didn’t mind as long as my hands were working.
Once the strips were cut, I marked their exact positions on the shiny support to ensure the exposure would be as even as possible. Then, I started adhering the strips piece by piece, leaving a 0.6cm gap between them until I got a beautiful LED screen. It would have been great if I could just plug it in and start printing, but there was a lot of soldering to be done beforehand.


Soldering the LED connections
I don’t solder often, but I have definitely learned that preparation is key. You need to get the wires ready by cutting, stripping, and applying solder to them. Solder also has to be applied to the connections on the LED strips so they will bond with the wires seamlessly. This is exactly what I did in the next step.


The shiny panel with the LED screen was ready, and so were the wires, so I started soldering everything together. I connected every second strip, so at the end, I had two separate lines that could be turned on with a switch. This way, I could adjust the power if needed.
After finishing the soldering, I tested each line just to be sure it was working—and it looked fabulous.


Installing the LED panel in the box
Once I was sure everything worked, I proceeded with gluing the LED screen inside the box using hot glue. I did the same with the two connectors at the end of each line, from where the cable runs towards the AC adapters.
I didn’t want too many cables running on the inside, as they might interfere with the light, so I decided to mount the AC adapters on the outside of the box. They tend to produce quite a lot of heat, and this way, they would be able to release it freely.
I drilled holes for the cables and glued the adapters to the box. The cables on the inside were secured using zip ties and a small amount of hot glue.


Wiring the power switches
In the final step, I wired and secured the switches. They are simple and cheap desk light switches, and they do the job great. In the future, I might consider installing a timer, so I can just enter the exposure time and the light will switch off automatically. This way, I won’t need to focus on it all the time.
The wires in these cables were tiny, but I managed to get it done. I was left with two plugs from each LED strip, which I didn’t really like, as there were already too many wires. So, I decided to join them together, leaving only one plug for both.


Results
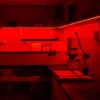
Once everything was wired, I tested the entire setup, and it worked perfectly. The UV exposure box produces strong, even light and is perfect for cyanotype, salt printing, albumen, and other historical processes.
This DIY build was affordable, effective, and easy to store. The adjustable power levels make it versatile, and I’m excited to use it for various creative projects. If you’re looking for an alternative to expensive commercial exposure units, I highly recommend trying this approach—it works just as well.


Watch the Build Video & Join the Community!
I also filmed the entire build process, which you can watch below or on my Youtube channel . If you found this guide helpful, I’d love for you to subscribe and join our creative community! 😊
Hi Nejc
I’ve been experimenting with a nail drying machine to expose cyanotypes, but am limited to 4”x6” prints because of its size – I can do a 5×7 at a push.
I really enjoyed your tutorial and wonder if you have a shopping list of the bits you used for yours.
I can get the grey tray fairly cheaply from a place near me, I just want to make sure I get the right electronics.
Many thanks
I am planning to do something like this, and I hope you can answer a couple of questions. How many watts in total does your LED array produce? (I had tried using a 100W panel light which was giving me about 6-7 minute exposures from 6 inches away, but the light was not even – not strong enough in the corners). Secondly, I noticed that your step wedge test looks much lighter at one end than the other. Why?
Thanks for your help with this!
Hi, where did you get the UV strips from ?
Amazon 🙂