


Turning Negatives into Golden Positives – How to Make Orotones with Zebra Dry Plates

Technique documented by Tom Lee (UK)
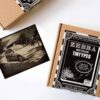
It all starts with a good negative…One of the most beautiful ways to showcase a photograph on glass is through the creation of an orotone—a luminous, golden-toned positive image backed with metallic brilliance. And yes, you can absolutely achieve this magic with Zebra Dry Plates. This in-depth process has been documented and generously shared by Tom Lee, a fellow photographer and dry plate enthusiast based in the UK.

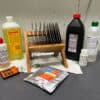
What You need to Get Started
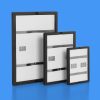
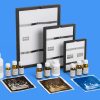
- Zebra Dry Plates (for both negatives and positives) HERE
- OHP transparency film (for inkjet negatives)
- Photo inkjet printer (capable of printing on transparencies)
- Enlarger or consistent UV light source (a torch can work if used carefully)
- Glass sheet (to keep negative and plate in contact during exposure)
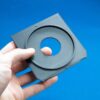
- Contact printing mask or plate holder (to keep everything aligned)
- Your developer of choice (diluted 1+59, or your preferred developer from our Developing chart) HERE
- Ilford Rapid Fixer HERE
- Paraloid B-72 resin or a simmilar golden paint
- Pure acetone (to dissolve the resin)
- Gold pigment or metal flake powder (for the orotone finish)
- Disposable pipettes or brushes (for pouring and spreading the resin)
- Lint-free cloth (for final polishing)
- Gloves & ventilation (especially when handling resin/acetone)
Optional but helpful:
- Programs like Photoshop, ChartThrob or Easy Digital Negative software (for calibration curves)
- Scanner (for analyzing test plates during the calibration stage)
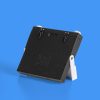
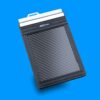
- Zebra Printing Frame (for optimal contact between negative and glass plate) HERE
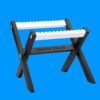
- Zebra display stand (for showcasing your finished plate) HERE
- Drying rack or dust-free surface to cure plates overnight HERE
- Golden-backed tintype plates (when pre-coated options become available)
From Digital to Glass: Building the Perfect Negative
While traditional methods rely on large-format cameras and in-camera negatives, Tom uses a hybrid approach—starting with any digital image and producing a digital negative specifically calibrated for contact printing onto glass.
The catch? A straight black & white negative usually lacks the tonal range required for alternative processes. That’s where calibration comes in.
Tom begins with a standard test chart (ChartThrob and Easy Digital Negative are great tools) printed onto OHP acetate. The chart is inverted—but not flipped horizontally—and printed as an RGB file, not grayscale. Each tool’s website offers solid guidance on getting this step right.To expose the plate, he uses a simple enlarger setup with consistent distance and timing (20 seconds in his case). You could even use a torch if you’re careful—what matters most is consistency.


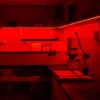
Contact Printing with Zebra Plates
Here’s where Zebra’s beautifully handcrafted glass plates take the spotlight.
- Place your Zebra dry plate (emulsion side up) into a mask to hold it steady.
- Lay the printed negative (emulsion side down) directly on top.
- Add another sheet of glass to keep everything flat. (You could also use a Zebra Printing Frame to ensure optimal contact and sharpness)
- Expose under your light source (20 seconds in Tom’s case).
Zebra includes a handy developer compatibility chart with each plate batch. Tom currently uses Fomatol LQN at a 1+59 dilution. At 20°C, a 4-minute development gives beautifully detailed results. After a quick rinse and fixing with Ilford Rapid Fixer, the plate is left to dry completely.
Calibrating for Tonal Range
To get consistent results across images, Tom scans the test plate and analyzes it in ChartThrob. The software produces a custom adjustment curve, which he saves and applies to future negatives in Photoshop. This curve is key—it ensures that every plate you print maintains full tonal richness.


Making the Final Positive
Once calibration is complete, the fun begins.
- Choose your final image and adjust/crop in Photoshop.
- Apply the saved adjustment curve, flatten the image, and invert it to a negative.
- Print the new negative on OHP acetate and let it dry for 10 minutes to clear any residual fog.
Back under the enlarger, the process repeats: plate emulsion side up, negative emulsion side down, a top glass to flatten, and the same exposure. Develop, fix, and allow to dry—often overnight for best results.

Alternate Method: Glass-to-Glass Printing
Tom also explores a beautiful all-analog variation: contact printing directly from a developed Zebra dry plate negative onto a fresh Zebra plate. This creates a true glass positive with remarkable depth and contrast—entirely through traditional darkroom means.
- Take your original Zebra negative plate (developed and dried).
- Place it emulsion side down over a fresh plate (emulsion side up).
- Sandwich them together with a clear glass on top for flat contac or use simply use a Zebra Printing Frame.
- Expose and develop the second plate just like before.
This pure analog approach is ideal for those working completely within the dry plate tradition.

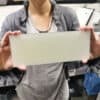
Finishing the Orotone 🌟
While a dry plate positive can be displayed with a white backing or used as a transparency (VIDEO), Tom goes a step further by creating a true orotone.
He uses Paraloid B-72, a conservation-grade resin dissolved in acetone and mixed with metal flake pigments (typically gold). This solution is poured directly onto the emulsion side, sealing it with a lustrous, golden finish that both protects and enhances the image.
After about 30 minutes of drying time, the plate can be polished and any excess scraped off—revealing an archival-quality orotone ready for framing or display.


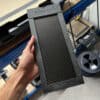
Bonus News: Orotone-Ready Zebra Plates in the Works?
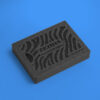
We’re excited to share that we’ve recently received test pieces of golden-colored tintype plates—featuring a gorgeous reflective base that could eliminate the need for resin pouring entirely.If these plates work well in testing, they could become ready-to-use orotone bases, allowing you to create brilliant positives with a single exposure and no post-processing.
👉 Would you use them? Let us know!
Take 10 seconds to vote in our quick poll: VOTE HERE
Your feedback helps shape what we offer next—and we’d love to hear from you!
Whether you’re blending digital and analog or staying true to 19th-century methods, this technique—expertly shared by Tom Lee (UK)—opens up an inspiring path for dry plate photographers. Orotone is just one of many creative directions Zebra Dry Plates can take you. ✨

Conclusion
Whether you’re blending digital and analog or staying true to 19th-century methods, this technique—expertly shared by Tom Lee (UK)—opens up an inspiring path for dry plate photographers. Orotone is just one of many creative directions Zebra Dry Plates can take you. ✨
Have you tried this process or want to see golden orotone plates in our catalog? Tag us on social or send us your thoughts—we’d love to hear from you!
Thanks Nejc, so eloquently put – much better than my notes…… Love to hear about your ready made orotone plates when you get them sorted.