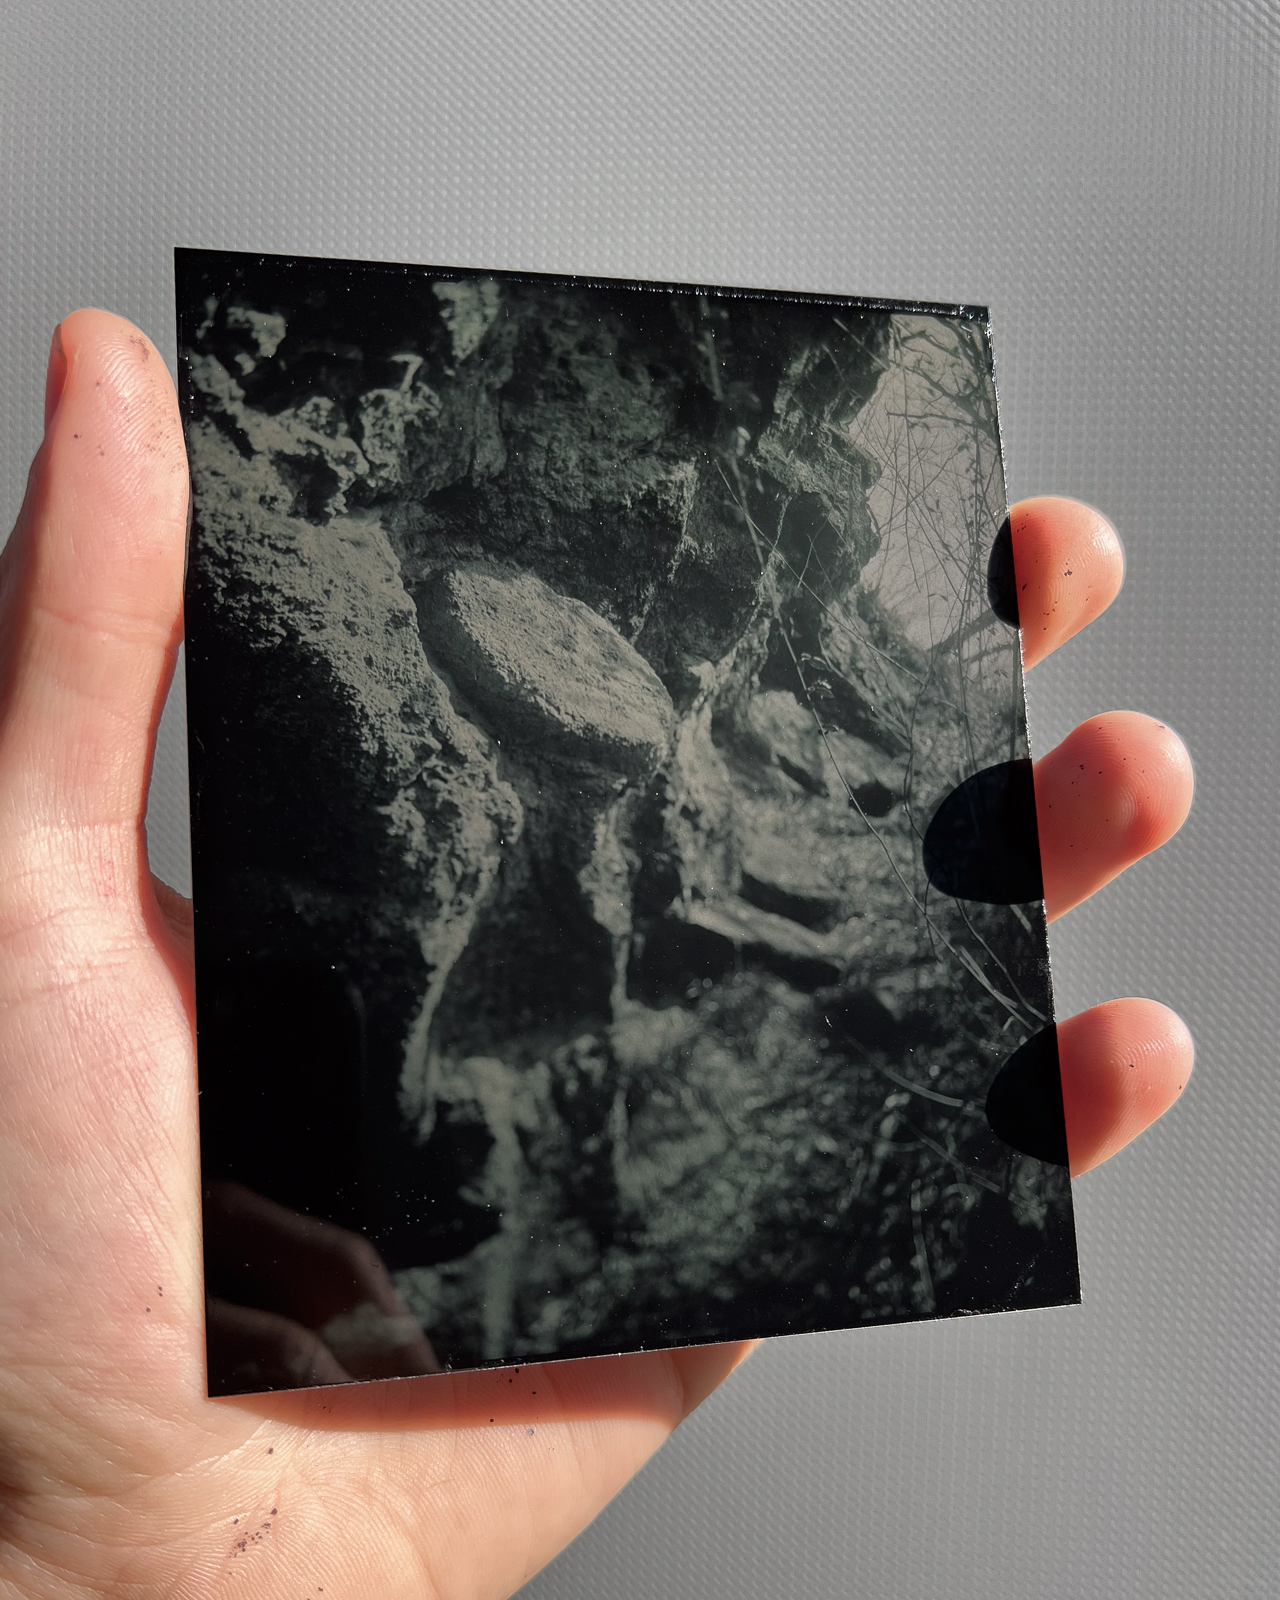
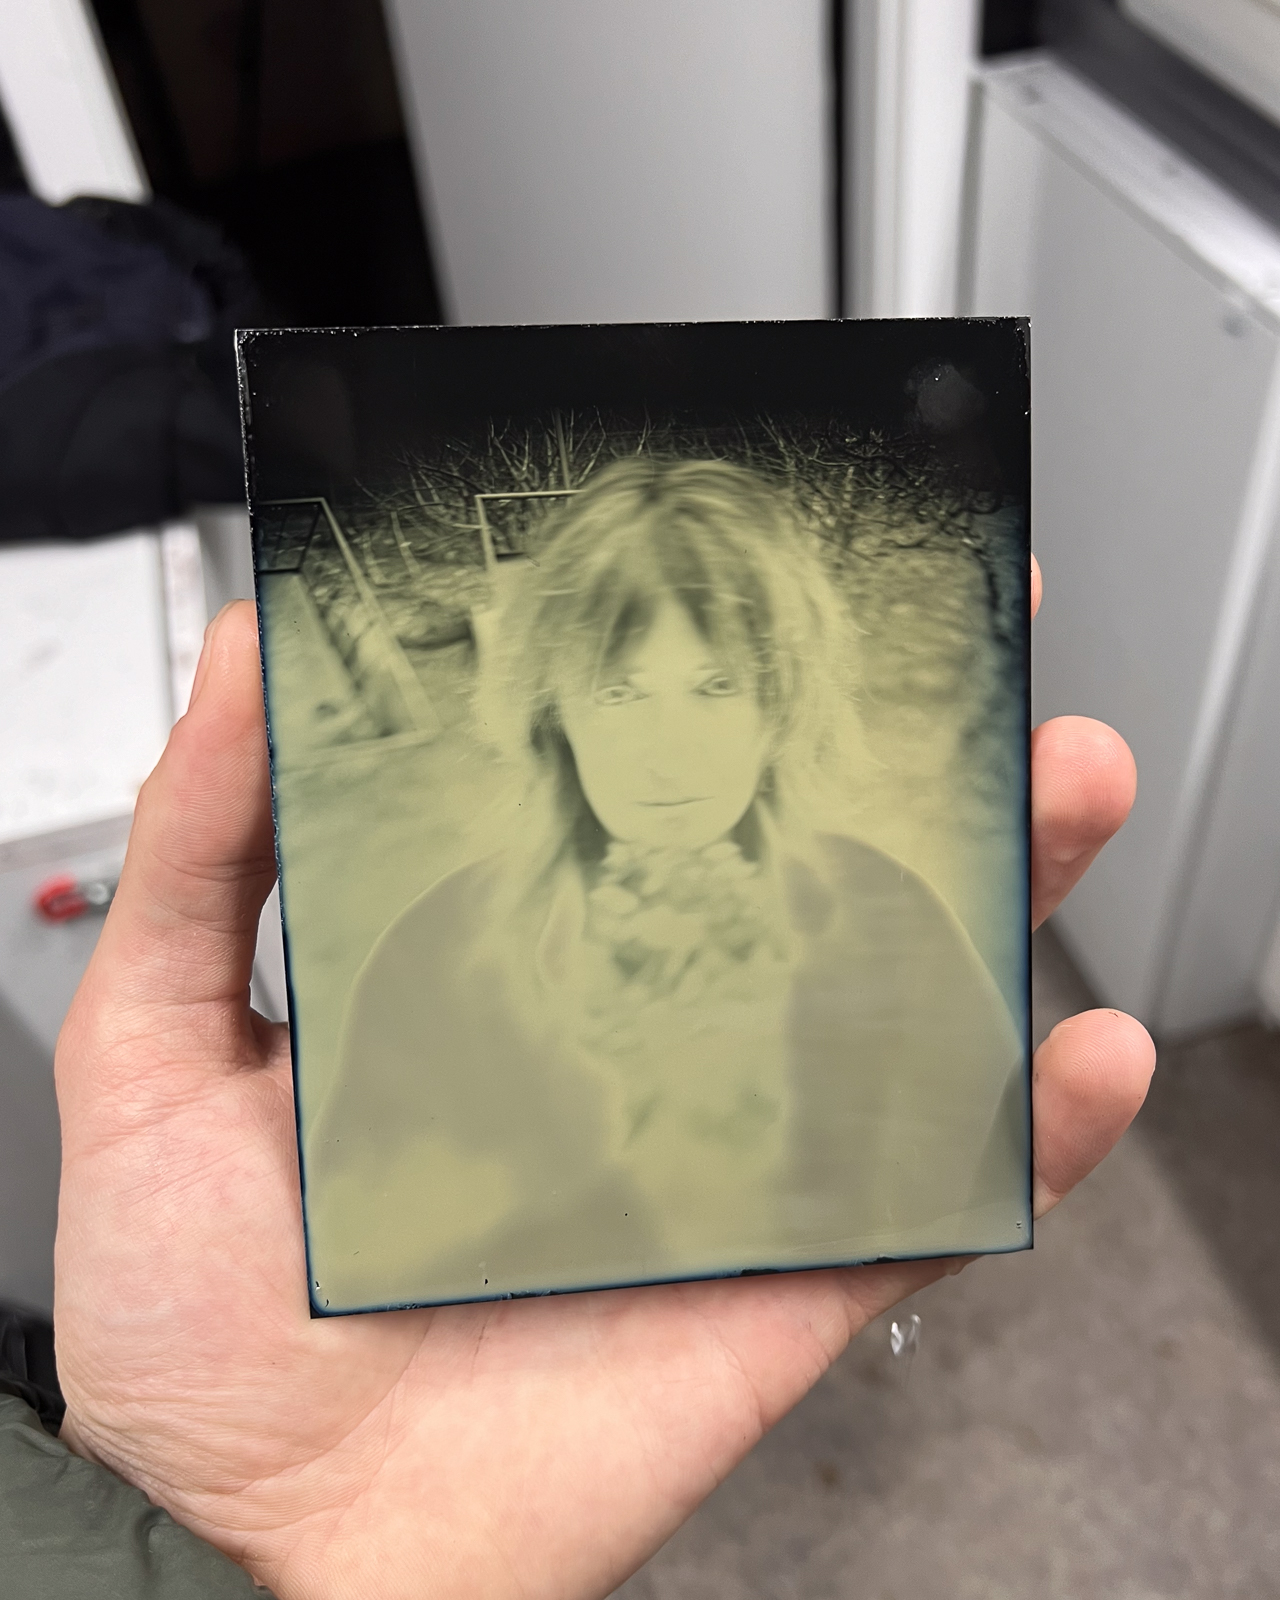
Table of Contents

Introduction

Tintype Dry Plates are back, and they’re here to be used – not just admired. This guide grew out of countless experiments in my darkroom, questions you’ve sent me by email, and the collective curiosity of a community that refuses to let 19th‑century magic fade away. If you’re new to Zebra Dry Plate Tintypes, think of this page as your companion in the field and in the darkroom: a place you can return to when something goes right and, just as importantly, when something doesn’t.

This is a living manual. As more of you shoot, share, and test, we’ll keep expanding it together.

History of Tintypes (Ferrotypes)

Tintypes, also known as ferrotypes, first appeared in the 1860s. Adolphe‑Alexandre Martin – while trying to improve the Ambrotype – replaced glass with a tin plate and stumbled onto something special. He didn’t commercialize it, but others like Hamilton Smith pushed the process forward and made it fast, accessible, and wildly popular. For decades, tintypes were the “polaroids of the era.” Even as new technologies took over, tintypes never fully disappeared; they simply waited for the right moment – and the right hands – to revive them.

What makes Zebra Dry Plate Tintypes different

Zebra Tintypes produce a direct‑positive look on a black surface with incredibly fine grain. They feel familiar to anyone who has worked with wet plates, but their biggest advantage is freedom: these are dry silver‑gelatin plates. You can expose today and develop next week without racing the clock or hauling a portable darkroom. The emulsion is hand‑poured, blue/UV sensitive, and inherently contrasty – rated around ASA 2 under winter light at mid‑latitudes. As with any primitive process, effective speed shifts with UV levels, but the payoff is that singular tintype glow.

Gear, Handling & Storage

Storage & Shelf Life

 Treat them like film. Cool and dry storage (around 13 °C or lower, under 60% RH) keeps them happy; the fridge is perfect. Avoid the freezer – condensation can make the emulsion swell and grab the wrapping paper. Stored properly, they’ll keep at least two years without noticeable fog or speed loss.

Handling & finding the emulsion side

Open the box under red safelights. Inside the sealed black bag, each plate is wrapped in acid‑free paper. Handle by the edges only. Plates are wrapped emulsion‑side down. If you’re unsure, look closely: one side is metallic; the other carries a thin, white matte film – that’s your emulsion.

Holders, adapters, and how to load

Exposure & Lighting (UV, Indoors & Flash)

Tintype plates are about 0.6 mm thick. Standard film holders won’t work; you’ll need dedicated gear.

Use a Zebra Wet Plate Holder (or similar) if you want a straightforward setup – no adapter required, just a firm back spring to hold the plate at the focal plane. Load emulsion side down and close the magnetic lid.

If you prefer the Zebra Dual Glass Dry Plate Holder V2 (or any dual glass holder), load the plate emulsion side up and close the slides carefully. Circular or triangular corner inserts tend to seat the plates best.

Whatever you do, reseal the remaining plates in the black bag immediately. A stray shaft of light can fog the whole stack.

Exposure: reading the light, not just the meter

Exposure on tintypes is a conversation with UV. Time of day, season, latitude, altitude, lens speed, bellows extension, and subject – all of it matters. Bright open scenes like sky, clouds, snow, or distant horizons need the shortest times. Interiors and heavy foregrounds take longer, and portraits indoors often stretch into minutes.

Extra exposure factors you’ll actually use

Indoors under tungsten, fluorescent, or LED light, there’s very little usable UV. Meter at ISO 2 and give about three stops more exposure. Expect minutes. Reciprocity is kind until about a minute; past that, add fifty percent. Beyond two minutes, plan to double. Close‑focus work stretches bellows; measure lens board to focal plane and apply the correction – bellows factor is simply bellows length squared over focal length squared. Higher altitudes mean stronger UV: above 500 m, shave roughly 10% exposure per 1000 m ascent (15% in the Alps).

If you like structure, use the Zebra Exposure Guides (based on Malcolm Dean Miller’s tables and tuned for Slovenian UV). They’re a solid starting point – just remember to adapt for your region’s UV index. When in doubt, bracket. Make a step‑test: one exposure as judged, the next at 2×, the last at 3×. Keep notes on light, time, lens, and scene. Those first plates teach you more than any paragraph can.

Using flashes indoors (controlled light is your friend)

[PHOTO: Studio flash portrait setup – large softbox close to subject]

These plates work perfectly with electronic flashes because the light is controlled and repeatable. At an effective speed around ISO 2, you’ll want serious output for indoor portraits and studio scenes. A total of ~1400 Ws (or more) is a solid baseline for comfortable apertures and larger modifiers; for really big soft sources, stopped‑down lenses, or bigger formats, add power or use multi‑pop exposures.

In practice, the flash burst is your exposure – keep ambient light low, set the shutter at or below sync (leaf shutters around 1/60–1/125 work beautifully), and let the strobe do the work. If you’re using barrel lenses, the classic lens‑cap method in a darkened room is fine because the flash duration is so brief.

Quick technical notes

  • Metering: If your flash meter supports low ISOs, set ISO 2–3. If not, meter at ISO 100 and then open +5⅔ stopsto approximate ISO 2 (or meter at ISO 3 and open +2/3 stop).

  • Power & distance: Bring the modifier close for efficiency and soft falloff; doubling the distance costs ~2 stops.

  • Multi‑pop: Fire 2–4 full‑power pops to accumulate exposure when you’re short on Ws. Keep the subject still and wait for full recycle between pops.

  • Modifiers & color: Neutral diffusion works best. Heavy warming gels eat blue light and lengthen exposure; compensate if you use them. Modern strobes with UV‑blocking glass still work well – don’t remove safety glass.

  • Modeling lights: Tungsten/LED modeling lights contribute little to exposure – treat them as focusing aids only.

This controlled setup is where dry plates shine indoors: consistent, repeatable lighting makes dialing in exposure straightforward and repeatable from session to session. Indoors under tungsten, fluorescent, or LED light, there’s very little usable UV. Meter at ISO 2 and give about three stops more exposure. Expect minutes. Reciprocity is kind until about a minute; past that, add fifty percent. Beyond two minutes, plan to double. Close‑focus work stretches bellows; measure lens board to focal plane and apply the correction – bellows factor is simply bellows length squared over focal length squared. Higher altitudes mean stronger UV: above 500 m, shave roughly 10% exposure per 1000 m ascent (15% in the Alps).

Exposure & Lighting (UV, Indoors & Flash)

What’s really happening in development (trust this part)

Tintype positives are not made by reversing a negative in the usual sense. The magic happens because ammonium thiocyanate partners with your developer to bleach the developing negative and redeposit silver in a way that will later read white against the black plate once the unexposed halides are removed. That’s why, in the tray, you mostly see a faint negative: it’s already being bleached while sitting on a pale background of unexposed silver halides. Don’t second‑guess it. In about 80% of properly exposed plates, that faint negative starts to show around the two‑minute mark (on a seven‑minute development). The true positive only arrives in the fixer, when the white/blank layer is carried away.

Developer chemistry & formulas (LATEST VERSION)

Want a quick, at-a-glance overview of dilutions, times, capacities, and substitutes? Open the Zebra Developing Chart – updated regularly:

Development: what to watch, what to ignore

The most common mistake is stopping too early. The image first looks like a thin, underexposed negative; the positive’s strength is still forming. Agitate gently for the first thirty seconds, then a few seconds every thirty thereafter to keep things even. If you realize you’ve underexposed, you can sometimes rescue a plate by extending development (I’ve gone to about 7min with good results). If the image bursts into view in ten seconds and races toward fog, cut your losses – rinse immediately and correct exposure on the next plate.

Kodak HC‑110

  • 300 ml water at 20 °C

  • 2 ml HC‑110 syrup

  • 2 g ammonium thiocyanate

  • Develop 7:00

  • Mix fresh; ideally one plate per batch for the strongest whites

510 Pyro

  • 300 ml water

  • 1.5 ml 510 Pyro

  • 2 g ammonium thiocyanate

  • Develop 7:00
  • Favored by some for tonality and micro‑contrast

Fomatol LQN

  • Dilute 1:59 (e.g., 5 ml stock + 295 ml water)

  • Add 2 g ammonium thiocyanate

  • Develop 6 min depending on exposure

Kodak HC‑110 substitutes?

  • Ilford Ilfotec HC, Adox HC-110 Syrup or Bellini HC‑110 – be aware that using a different HC can mean you will have to adjust the amounts to make it comparable to Kodaks version.

Capacity & reuse

  • Fresh developer yields the brightest whites. For best results, mix fresh per plate. If you reuse, limit to 1–2 platesand add roughly +20 seconds for each subsequent one..

Fix, Wash, Dry & Finish

Fixing: step that reviews the positive!

Fixing for positive plates can be done in daylight! Rapid fix clears a tintype decisively. Use it strong enough, agitate, and wait for the milky veil to vanish completely before you start the clock on your “to be safe” extra minute or two. Hand‑coated emulsions are thicker than you think; thorough fixing is your insurance against muddy positives and future stains.

Rapid Fix (recommended)

  • Dilution 1:4

  • Time ≥ 4 min with constant agitation (many plates clear in 3–4 min)

  • Visual cue: continue until all white/milky areas are gone, then extend 1–2 min

Faster options

  • 1:2–1:3 dilutions clear faster; use with care and agitation

Standard (hypo) fixers

  • Expect longer times – often double a rapid‑fix schedule

Rinse, wash & dry

Stop the developer with a simple water rinse of about a minute. Then wash thoroughly – ten to fifteen minutes in running water under 20 °C, or several tray changes if that’s your setup. A touch of PhotoFlo at the end helps tame drying marks, especially in hard‑water areas. Dry on a rack in moving air; depending on temperature and humidity, it takes four to twelve hours. Avoid hair dryers – the emulsion is still soft and will glue airborne dust in place forever. Expect the hue to shift slightly as the dried surface reflects light differently. 

Results & Variations

What a good tintype looks like (and why)

A well‑exposed, well‑developed Zebra tintype presents a bright positive with a slightly warm, milky‑white character. Under warm room light, the plate may read warmer; take it into open shade and you’ll see it settle toward neutral. Uniformity across the plate depends on how deep and how evenly the developer penetrates, which in turn is tied to time, strength, and your ammonium thiocyanate balance. Too little developer and the edges (where emulsion is thinner) may outrun the center. Too much AT and you can over‑solve silver at the edges. Hue itself is a matter of particle size – more AT tends to cooler, smaller‑particle whites; less AT favors warmer tones.

Ambrotypes on standard glass dry plates (positive developer option)

If you love the tintype positive look but want it on glass, the same ammonium thiocyanate positive developer formulas work beautifully on Zebra Standard Glass Dry Plates to produce ambrotypes. The workflow feels familiar expose, develop, fix, wash then finish by adding a black backing so the bleached negative reads as a bright positive on glass.

In practice, start with exposures similar to your Standard Plates. For stronger, whiter highlights, give about +1 stop compared to your normal negative workflow, then process with one of the positive formulas below. Trust the full development time: the true positive appears in the fixer once the white halides clear.

Recommended positive formula (on glass)

  • HC‑110 Enhanced: 300 ml water @ 20 °C + 2 ml HC‑110 syrup + 2 g ammonium thiocyanate7:00

The rest of the wet steps mirror tintypes: brief rinse, thorough rapid fix to completion, 10–15 min wash <20 °C, then dry.

Backing options (to reveal the positive)

  • Reversible backing (conservation‑friendly): Place matte black velvet or acid‑free matte black card behind the plate in the frame. No chemicals touch the glass; you can swap the backing anytime.

  • Permanent black backing (historical look): Spray the back (non‑emulsion side) of the glass with matte black acrylic enamel or nitrocellulose lacquer in 2–3 light coats. Let each coat flash off; allow a full cure before framing. Historically, asphaltum varnish was also used.

Tips: Mask edges to keep the front clean; never spray near the emulsion. If desired, you may varnish the emulsion first (e.g., 70% Chroma varnish + 30% turpentine) for extra protection; let it cure fully before any backing.

The result is a classic glass positive with luminous whites and depth that’s distinct from metal plates. Display in a frame or on one of our angled plate stands for shelf or desktop presentation.

No camera? No problem! Contact printing with film positives

Yes, it works beautifully. Any light source will do, but an enlarger gives you control and repeatability. Treat it like paper printing: make test strips, keep development constant, and vary only exposure until you dial it in. Depending on density and light intensity, five to seven seconds is a common starting range.

Troubleshooting & Resources

Troubleshooting that actually helps

Here are quick, practical fixes for the most common issues. Keep your changes surgical – adjust one thing at a time and retest.

Insufficient fixing

  • Symptoms: Milky veil that never fully clears, muddy/low contrast whites, yellowing after drying.

  • Likely cause: Fixer too weak/exhausted, time too short, or agitation too gentle.

  • Fix now: Rewet (if already dry, soak in water 5–10 minutes), then rapid fix 1:4 with constant agitation until completely clear +3–4 minutes.

  • Prevent next time: Mix fresh rapid fix, keep baths at ~20 °C, agitate throughout, and replace fixer regularly.

Very blue hue

  • Symptoms: Whites skew cool/blue rather than neutral/milky.
  • Likely cause: Too much ammonium thiocyanate, probably you need a more precise scale!
  • Fix now: Reduce AT slightly (e.g., from 3 g → 2.0–2.5 g per 300 ml), keep 20 °C, and shorten development a touch while still honoring the full required time for the chosen formula.
  • Prevent next time: Standardize temperature, avoid over-bleaching, and evaluate hue in open shade/daylightbefore judging.

Dark plate (underexposure)

  • Symptoms: Overall dark image, weak highlight separation; highlights slow to appear (>30 s) in developer.
  • Likely cause: Not enough exposure (especially indoors with low UV) or significant reciprocity.
  • Fix now: Extend development (you can often rescue by going up to ~9min on 4×5); for the next plate, add +1–2 stops exposure. Indoors, remember ISO 2 +3 stops over meter reading and account for reciprocity.
  • Prevent next time: Use the exposure guides, bracket early, and note the 20–30 s highlight cue in developer.

Solarized look (overexposure + overdevelopment)

  • Symptoms: Image flashes up in ~10 s, goes gray/flat quickly, odd halos, crushed blacks with veiled highlights.
  • Likely cause: Too much exposure compounded by strong/long development.
  • Fix now: If you see the burst, pull early and rinse to stop development. Consider switching to the HC-110 Enhanced formula (2 ml HC-110 + 2 g AT in 300 ml @ 7:00) for better highlight control.
  • Prevent next time: Reduce exposure 1–2 stops, verify developer strength and 20 °C, and avoid excessive agitation.

If your contrast is weak, start by checking the boring stuff: fixer completion, safelight fog, and developer freshness. Using a developer that doesn’t match this emulsion (or skipping ammonium thiocyanate) will leave you chasing your tail. If your whites feel creamy instead of crisp, you may be under‑developing or working with an exhausted bath. Uneven patches usually come from thin coverage or agitation that’s too timid – or too vigorous.

When something goes wrong, change one thing at a time. Re‑establish a baseline: fresh, correct chemistry; verified safelight; a known exposure. Then tweak.

When something goes wrong, change one thing at a time. Re‑establish a baseline: fresh, correct chemistry; verified safelight; a known exposure. Then tweak

Advanced handling & larger formats

Tank development with Zebra Daylight Processing tank is a solid way to run multiple plates at once, provided you give them enough solution and keep your ratios. 

When something goes wrong, change one thing at a time. Re‑establish a baseline: fresh, correct chemistry; verified safelight; a known exposure. Then tweak

European sizes & vintage camera compatibility

Finishing, presenting, and storing

[PHOTO: Vintage 9×12 plate camera with appropriate holder] Modern dry plates play well with old cameras. 9×12 cm plates are happy in the right vintage holders, and 13×18 cm is on the roadmap. Most classic plate cameras can be brought back to life with the correct holder and a little care around the focal plane. Zebra can make all of this possible from constructing a custom holder to making custom plates!

Supplies & resources

 Ammonium thiocyanate is an essential part of this process and, as far as we know, has no true substitute. You can source it from photo suppliers and chemical vendors; it’s stable when stored dry and is generally shipped without special hazard handling. When standards like Kodak HC‑110 or D76 go missing in your area, look to Ilford Ilfotec HC, Bellini HC‑110, and Adox D76 (or Ilford ID‑11) and keep the ammonium thiocyanate addition consistent – then test and fine‑tune.

If you need a single destination, the Zebra / Darkroom Chemistry shop carries ammonium thiocyanate along with developers, fixers, plate holders, and accessories.

Once dry, silver‑gelatin is tougher than it looks, which makes tintypes perfect for fairs and portraits – you can simply dry the plates and gift them as they are. If you prefer a sealed surface, you can varnish: pour on, pour off the excess, and let the plate dry perfectly flat.

Varnish mix (optional)

  • 70% Chroma varnish

  • 30% turpentine

Framing behind glass is always a safe choice for display. We also offer stands for displaying the plates at just the right angle perfect for shelves, fairs, and desktop presentation. For storage, slide plates into stable plastic sleeves or reuse the acid‑free wrapping they arrived in. Keep them vertical in a tightly packed manuscript box or a box with grooves so they don’t flex or scuff.

Equipment:

Chemicals:

Ongoing research & how you can help

Zebra Dry Plate Tintypes are still evolving. Developer choices and working methods will keep getting better as more people shoot and share. If you discover a dilution, time, or workflow that consistently gives great results, send it over – notes, images, even near‑misses are useful. I’ll fold the best of it back into this manual so the whole community benefits.

Wishing you good light – and beautiful tintypes.

If you need a single destination, the Zebra / Darkroom Chemistry shop carries ammonium thiocyanate along with developers, fixers, plate holders, and accessories.